DreamBooth
Introduction
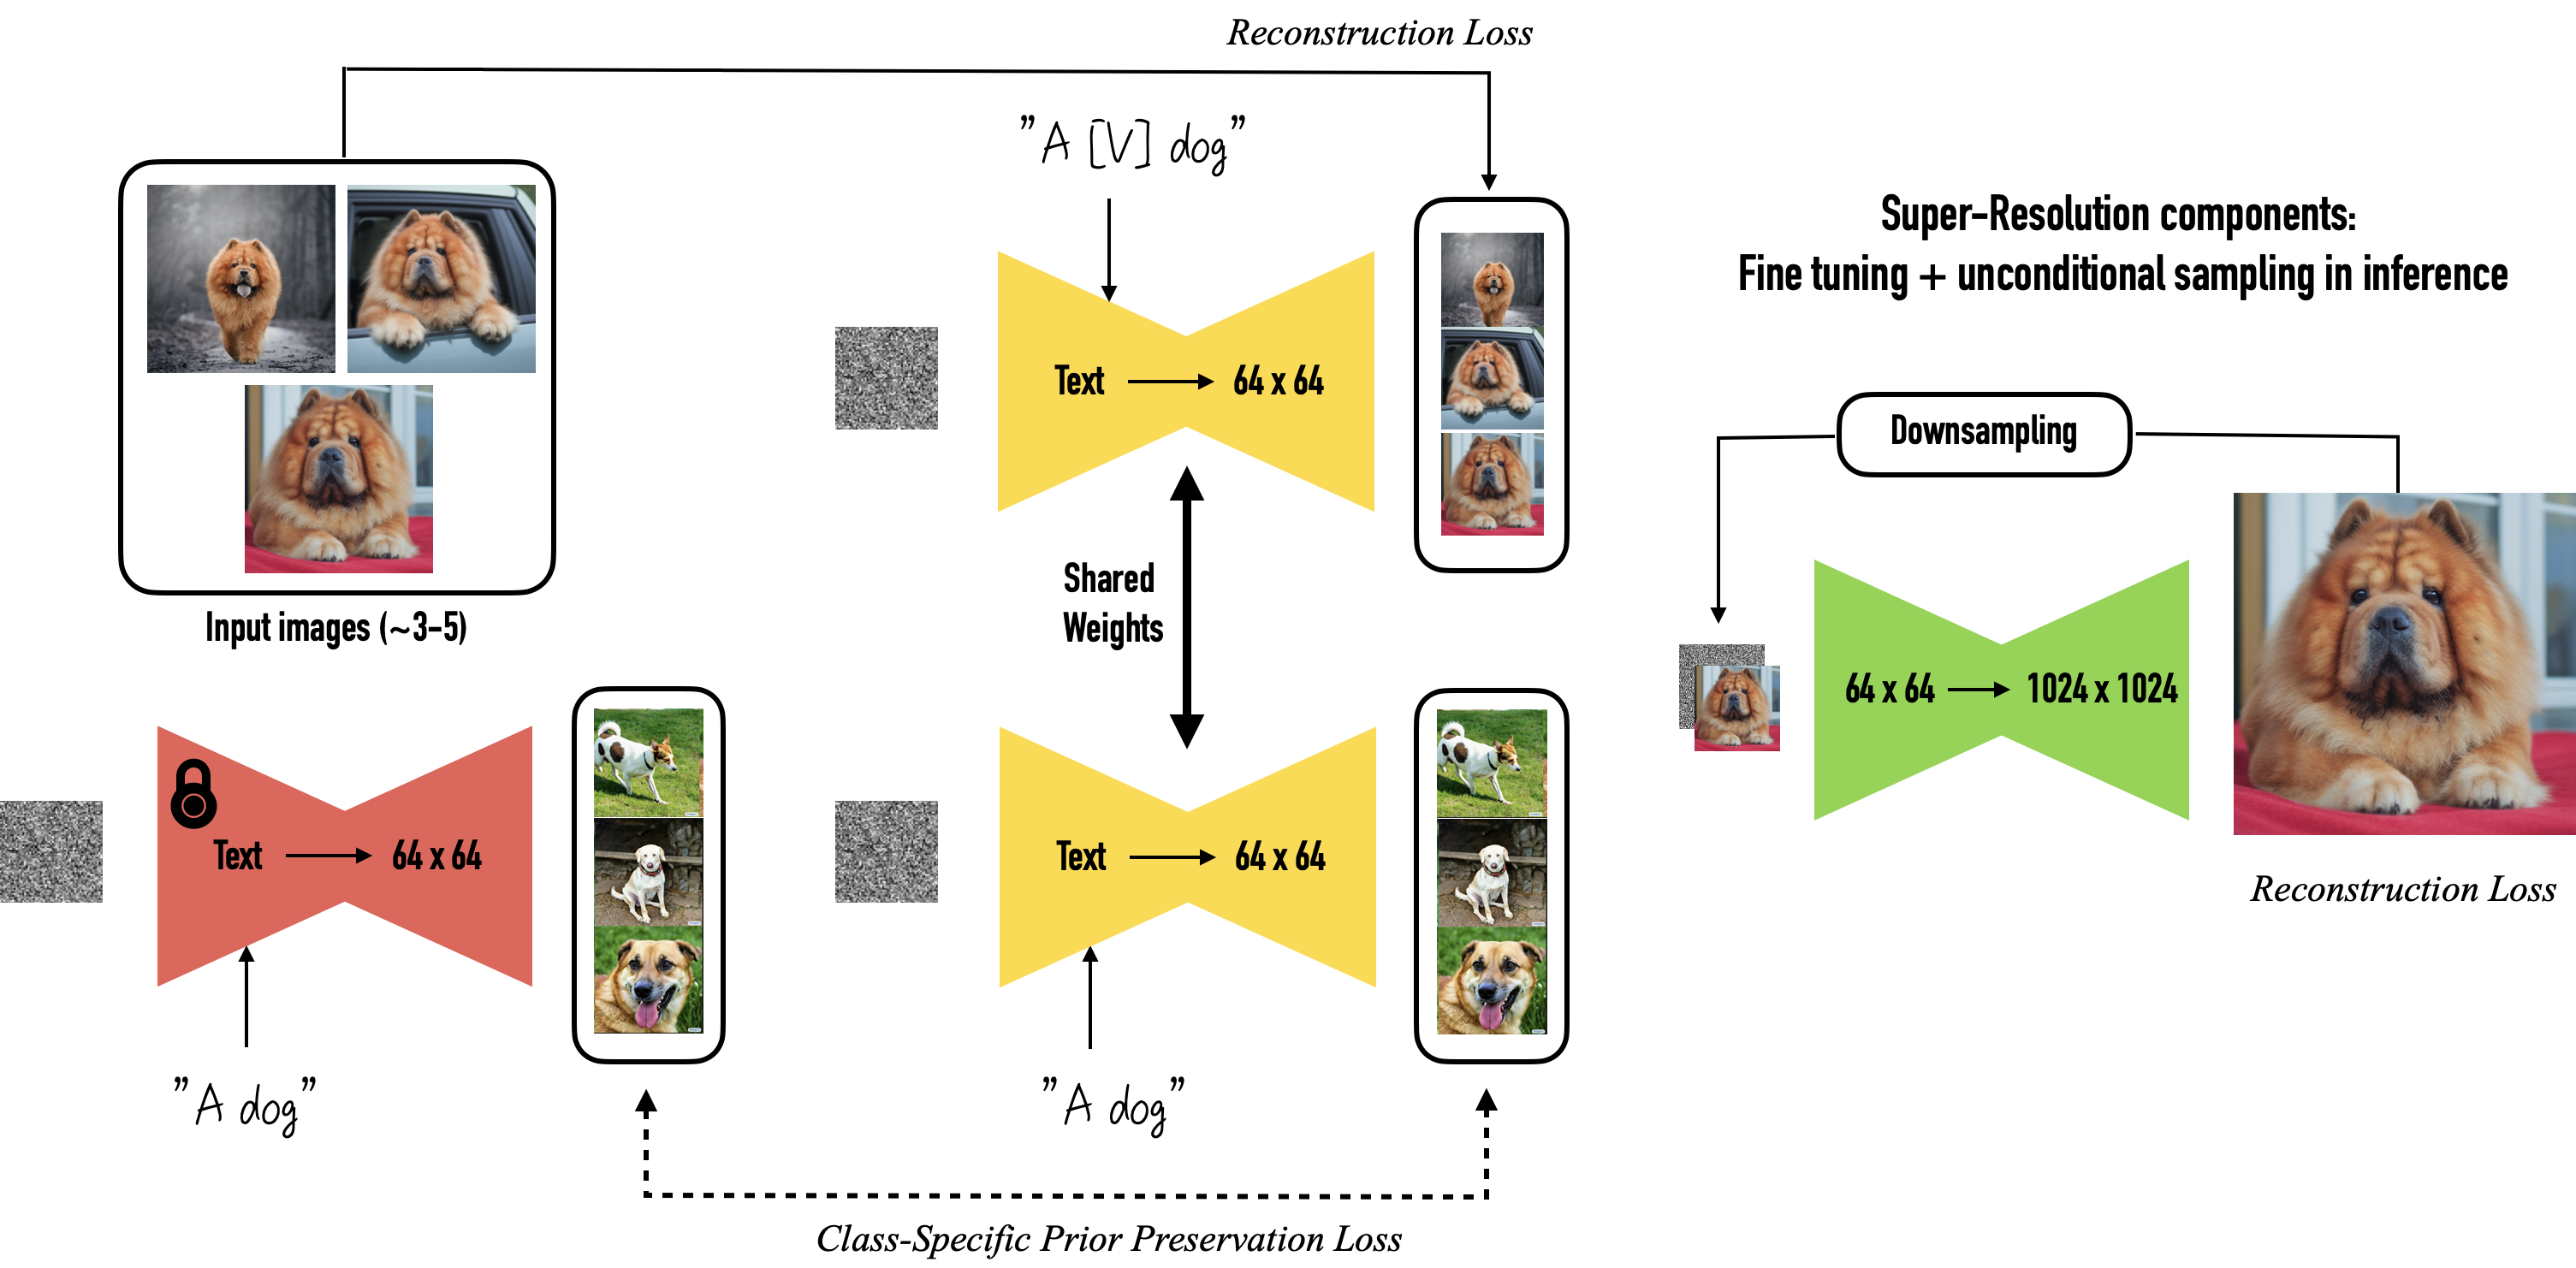
DreamBooth is a way to customize a personalized TextToImage diffusion model. Excellent results can be obtained with only a small amount of training data.
Dreambooth is based on Imagen and can be used by simply exporting the model as a ckpt, which can then be loaded into various UIs.
However, neither the Imagen model nor the pre-trained weights are available. So the original Dreambooth was not suitable for Stable Diffusion. However, diffusers later implements Dreambooth and is fully adapted to Stable Diffusion.
Diffusers provides pre-trained diffusion models across multiple modalities (e.g. visual and audio) and is supported as a modular toolbox for diffusion model inference and training.
This section uses the diffusers branch version of Shivam Shirao to explain the parameters, with a configuration derived from ShivamShrirao/diffusers.
We recommend using CCRcmcpe's optimized branch for Stable Diffusion, which can be used with Yaml files.
by https://dreambooth.github.io/
Select
Windows systems require a minimum of 16GB of video memory, Linux systems require a minimum of 8GB of video memory.
-
CCRcmcpe/diffusers/ that prefers Yaml file configuration, which can be configured using Yaml files.
-
DreamBooth version for AutoDl/native by Kurosu Chan
-
Package Mirror for AutoDl/native, called
dreambooth-for-diffusion, but poorly maintained. -
Plugin for WebUi, but still to be enhanced.
-
Nyanko Lepsoni's Colab Notebook for Colab by Nyanko Lepsoni.
-
Colab Notebook for RcINS for Colab provided by RcINS (https://t.me/StableDiffusion_CN/196744).
Colab notebooks from Community
Preparation
If you choose to use the AutoDl image, you will need to move the dreambooth-for- diffusion folder to autodl-tmp (the data disk) and make sure that the path (the string before the #) is dreambooth-for-diffusion, as detailed in the tutorial The details are illustrated in the tutorial [].
Model transformation
The following type of command is available in each notebook or mirror and serves to convert the ckpt model to diffusers weight format for training.
- Pre-training example
python diffusers\scripts\convert_original_stable_diffusion_to_diffusers.py --checkpoint_path model.ckpt --original_config_file v1-inference.yaml --scheduler_type ddim --dump_path models/diffusers_model
- Post-training example
The training is also packaged and converted to ckpt, which can be used in various UI's.
python diffusers\scripts\convert_diffusers_to_original_stable_diffusion.py --model_path models/resultModel --checkpoint_path result.ckpt --half
Datasets
The creation of the dataset is the most important part of getting good, consistent results in Dreambooth training.
- Content requirements
Always use high quality samples, content such as motion blur or low resolution can be trained into the model and affect the quality of the work.
When training for a specific style, pick samples that have good consistency. Ideally, only pick images of the artist you are training. Avoid fan art or anything with a different style, unless your goal is something like stylistic fusion.
For themes, samples with black or white backgrounds are extremely helpful.
Transparent backgrounds work too, but sometimes they leave a white outline around the subject, so I don't recommend using them at the moment.
If you need to make your Dreambooth model more varied, try to use different environments, lighting, hair styles, expressions, poses, angles and distances from the subject.
Be sure to include images with normal backgrounds (e.g. of the object in a scene). Using only images with simple backgrounds will be less effective.
Avoid having hands stuck to the head in your renders by removing all images where the hands are too close to or touching the head.
If you need to avoid a fisheye lens effect in your renders, remove all selfie images.
To avoid unnatural over-blurring, make sure the image does not contain a false heavy depth of field or vignetting.
- Adjustment
Once you have collected the photos for your dataset, crop and resize all images to a 512x512 square (you can batch crop using the BIRME online tool) and remove any watermarks, logos, people/limb cut off by the edges of the image, or anything else you don't want to be trained on. Save the images in PNG format and place all images in the train folder.
Annotating images
You can annotate manually or automatically using clip or deepdanbooru.
We recommend using crosstyan/blip_helper to label your images. Or use DeepDanbooru and BLIP
If you use AutoDl's mirrors, you can use the built-in label_images.py for labelling.
Augmentation
- There are many ways to manipulate data: the most common are inversion, rotation, brightness and cropping.
Related examples for reference Further improve the accuracy of Diffusers-based DreamBooth: augmentation edition.
It may be useful to break up the image, or to crop the background/headers etc. separately.
Parameters
First let's look at the Yaml configuration file from CCRcmcpe diffusers version of the Yaml configuration file.
DreamBooth itself cannot train the so-called painting style. Instead, Native Training fine-tunes the model to bring about a change in the painting style as a so-called painting style training method.
The classical idea is.
Native + deepdanbooru->prompt txt - "training style"
Dreambooth + class prompt/instance prompt - training objects
But there are many more categories, with differences such as: whether to pair Prompt to each image, whether to enable prior_preservation loss (PPL), whether to use train text encoder (TTL) 4
DreamBooth = instance + class with prior preservation loss (where the difference is between giving images separate tags, and using a single tag).
DreamBooth
Specialises in training specific objects/people. Use -with_prior_preservation to enable DreamBooth, **Only DreamBooth training uses the concept of [V] and the parameters associated with -instance_prompt. **
-
Instance Image the object you are training on
-
The default implementation of Instance Prompt is to share a prompt globally, which may work for a few shots, i.e. DreamBooth (original paper method). However, when you have more targets to train you can turn on the
combine_prompt_from_txtoption and have a prompt (usually a txt) for each instance, i.e. DreamBooth (alternative method). The Instance Prompt should contain a unique identifier [V]. See below for a detailed explanation. 4 -
Class/Regularization Image corresponds to
--class_data_dirand should be autogenerated i.e. an auto-generated image, used to detect AI prior knowledge. You should not put any non-AI generated images. (Why not use Native Training if you are sure about this?) Adulteration of same-style images in clas images is no longer encouraged. Each time you retrain a different subject, you have to clear it once. -
Class Prompt corresponds to
--class_prompt, which is arbitrary, and is generated automatically; it is recommended that it be generated separately from other inference front-ends that support CLIP SKIP 2 and then dropped into the class img set. The program can also read the contents from a separate txt. 4
DreamBooth itself has a very strong copy and paste effect, which can be suppressed by using class/regularization. 4
For training multiple objects read the Multiple Concept section.
- Example train_object.sh
Native Training
Unlike DreamBooth, Native Training uses your training set to train directly and does not require a Class Image.
Turning off the prior_preservation option to start training natively is the recommended way to "train in style".
There is no Instance/Class Image distinction in this training, all graphs are used for training. However, you need to prepare an Instance Prompt for each image, in a text file with the same name as the image, usually a txt, for example dataset exp
This txt file with the same name as the image is subsequently read as a label by enabling --use_txt_as_label (this option ignores the content of the instance_prompt argument passed in).
Native Training requires more datasets, but the amount varies, in the range [100, 10000], more is better (but manual selection is still recommended)
- Example train_style.sh
Parameters
- with_prior_preservation
Enable prior_preservation to start DreamBooth training, disable to enable Native Training.
- prior_loss_weight
The lower it is, the harder it is to fit, but also the harder it is to learn something. 43
- learning_rate learning_rate
DreamBooth itself has a very strong copy and paste effect. Use class/regularization to suppress the effect appropriately.
- use_txt_as_label
Typically used when training a fine-tuned model in Native. Enabling this option turns off DreamBooth, which ignores the instance_prompt argument and reads the label from the txt file instead.
- center_crop
The script comes with an option to crop the image, it is recommended that you crop it to a square.
- resolution
The resolution of the image (usually 512), defining this parameter will scale the image.
- max_train_steps
The maximum number of training steps, usually 1000, if your dataset is large then increase the value.
The number of training steps is generally chosen such that training steps = (reference image x 100).
- save_model_every_n_steps
Save_model_every_steps is a good way to see the intermediate training results and find the best model, it can also be used to restore the last training results from a checkpoint (colab laptop users are advised to mount to the cloud).
- lr_scheduler
learning rate moderator, optionally constant, linear, cosine, cosine_with_restarts, cosine_with_hard_restarts
- with_prior_preservation
Enable prior_preservation to start DreamBooth training.Disable to enable Native Training
- prior_loss_weight
the lower prior_loss_weight the harder it is to fit, but also the harder it is to learn. 43
Explanation of Instance Prompt / Class Prompt
class prompt will be used to generate a class of images that will be treated as something like photo of a person
instance prompt will be processed as something like photo of a cute person
-
Examples
-
Example of a training character
- Instance prompt:
masterpiece, best quality, sks 1girl, aqua eyes, aqua hair -
Class prompt:
masterpiece, best quality, 1girl, aqua eyes, aqua hair -
Examples of training styles *
- Instance prompt:
1girl, by sks - Class prompt:
1girl
About [V]
| What your training set is about | Instance prompt must contain | Class prompt should describe |
|---|---|---|
| A object/person | [V] |
The object's type and/or characteristics |
| A artist's style | by [V] |
The common characteristics of the training set |
[V] is only used in the Instance prompt and is a token in the CLIP vocabulary that has no meaning for the model. **This is a phrase set by you, analogous to the unknown quantity x of the equation, not an exact value called [V]. **
Suppose the character you want to train is called [N] (e.g. Mr. Balabalabala) , you should not use [N] (Mr. Balabalabala) directly as a representative feature word. 4
It is recommended to use the word [V] (e.g. bala) that exists in this glossary but has no corresponding concept or where the corresponding concept is not obvious.
Long names are likely to be separated into multiple tokens and will not have the desired effect. The separation of tokens can be verified at NovelAI Tokenizer.
The final hint representing [V] will carry the new things learned by the model and you will be able to use the [V] you set when generating it.
Note: The example word
sksused in the original paper is the same as the real firearm SKS and is not a suitable word to be used. However, if you are sufficiently trained you may be able to override its impact.
TIPS: Don't use the default by sks (the artist sks), fusion models can be a disaster.
Explanation of Subject images / Class images
Introduction from 2
Subject images (or instance images as you see them in your notebook) are the images you want to train on, so if you want your own looking model, you can take 20 to 40 of your own images and input those. The instance name is a unique identifier that will indicate the trained object in the prompt, personally I use "namelastname", most notebooks use "sks" but it is best to change it.
You are in effect telling the AI to introduce you to the database, to do this you choose a class, i.e. the one that best fits the class you are training, for people it is common to use "person", "man"/"woman" etc.
The purpose of using Class images in training is to prevent features of objects from "bleeding over" into other objects of the same Class. Without Class images as reference points, the AI will merge your face with other faces that appear in the Class. **Your face will infiltrate the other faces generated by the model. **
DreamBooth can start training without Class images, just disable -with_prior_preservation to enable Native Training.
Native Training
Native Training is native training. Unlike DreamBooth, Native Training uses your training set for training directly and does not require Class images.
Turning off the -prior_preservation option (aka the -with_prior_preservation parameter) to start training natively is the recommended way to train in the style.
There is no Instance/Class Image distinction in this training, all images will be used for training. However, you need to prepare an Instance Prompt for each image, with the same file name as the traditional hypernetwork, usually txt.
About this Txt
For each image in the dataset ([X].png/[X].jpg), put a [X].txt with the corresponding hint, then set READ_PROMPT_FROM_TXT (--use_txt_as_label). The prompts read from txt [PX] will be inserted into the prompt [P] you set in the training parameters. By default, it is inserted as [PX][P].
With Variable Prompts enabled and Prior Preservation Loss (PRIOR_PRESERVATION) disabled, the training process is effectively equivalent to standard fine-tuning. Native Training requires a large dataset, but the amount varies, and is in the range [100, 10000], so more is better. (manual selection is recommended)
labeled method
You can annotate manually or use clip or deepdanbooru for automatic annotation. We recommend using crosstyan/blip_helper to label your images. or use DeepDanbooru and BLIP If you use AutoDl's mirrors, you can use the built-in label_images.py for labelling.
Resume training from checkpoint
The MODEL_NAME of the parameter is changed to the position of the last model.
If you use CLASS_DIR, you don't need to clear it because the subject is the same, but vice versa.
Train Text Encoder
The use of -train_text_encoder in the corresponding example is not recommended. With --train_text_encoder, Dreambooth training trains additional text encoders, making it impossible to generalize the prompt between different models.
There is a metaphysical argument that this should be turned off after a certain percentage/epoch/step of training has been reached to prevent overplaying.
- The instance prompt you write at the beginning should be long and summarise your training goal (but not so long that it covers your usual words) (e.g. girl I would replace with woman, 1boy with male)
- Firstly, the text prompt should be read in as a mail. Because too many words are distracting, the effect is not obvious.
- Secondly, the instance prompt cannot be filled in with just one
[V], otherwise the word will be wasted too. - Try a big fire burst
If you refine the call, add the word you trained for instance prompt, depending on how much flavour you want.
Maybe it's also effective when training characters.
Multiple Concept
With DreamBooth it is possible to train multiple concepts/characters/actions/objects with the --concept_list argument in the example. However, if you train two characters, you cannot infer that they are both present at the same time, and their features will be mixed.
If you check the --concept_list parameter with other versions of the DreamBooth training method, you can read in a similar json file.
- concepts_list.json
# You can also add multiple concepts here. Try tweaking `--max_train_steps` accordingly.

concepts_list = [
    {
        "instance_prompt":      "photo of zwx dog",
        "class_prompt":         "photo of a dog",
        "instance_data_dir":    "/content/data/zwx",
        "class_data_dir":       "/content/data/dog"
    },
#     {
#         "instance_prompt":      "photo of ukj person",
#         "class_prompt":         "photo of a person",
#         "instance_data_dir":    "/content/data/ukj",
#         "class_data_dir":       "/content/data/person"
#     }
]

# `class_data_dir` contains regularization images
Aspect Ratio Bucketing
Corresponds to --use_aspect_ratio_bucket in the argument above. If you need to use it in Colab, -aspect_ratio_bucket is set to enable: true.
Aspect Ratio Bucketing is known as ARB, the original training only works with 1:1 images, enabling ARB makes it possible to train non-1:1 images, but not at any scale, and images not in the bucket will be cropped.
[[ 256 1024], [ 320 1024], [ 384 1024], [ 384 960], [ 384 896], [ 448 832], [ 512 768], [ 512 704], [ 512 512], [ 576 640], [ 640 576], [ 704 512], [ 768 512], [ 832 448], [ 896 384], [ 960 384], [1024 384], [1024 320], [1024 256]]
ARB is not compatible with DreamBooth and is only recommended for Native Training.
For more, see Analysis of experiments using Dreambooth to train Stable Diffusion
Training
Follow the notebook steps or instructions to train, Colab users should be careful to mount the disk to prevent disconnection.
After training, convert the diffusers weights to a ckpt file before you can use them! Use a file like diffusers2ckpt.py.
Some scripts provide a
-halfparameter to save the float16 half-precision model, which halves the size of the weights file (about 2g), but the effect is essentially the same.
WebUi users copy the trained .ckpt file into the models\Stable-diffusion directory of webui and switch between models in the top left corner of webui to use it.
To use it, enter the flags you specified before in prompt (e.g.
The effect of the model will depend on the test image.
Using on Windows
The content here is suitable for who want to train on Windows systems.
From [^18]
Dreambooth on Windows can use an optimized version of ShivamShrirao to save VRAM, diffusers/examples/dreambooth by ShivamShrirao.
The deployment method used for Linux cannot be used directly on windows due to the associated library, and for the same reason the minimum 9.9G of RAM required for this optimised version on colab should be slightly higher on windows, so it is recommended to use at least a 12G VRAM GPU.
i has only tested this on machines with 16G of RAM, 12G of RAM is theoretically possible.
Tip
When modifying or overwriting files in the original repository, please make a backup.
Prepare your environment with Git, Python, MiniConda (or MiniConda).
The following steps work in python 3.8, windows 10 22H2, other environments have not been tested
Create a working directory in which to build the venv virtual environment for python 3.8
    python -m venv --system-site-packages venv_dbwin
    venv_dbwin\Scripts\activate
    python.exe -m pip install --upgrade pip
Clone the optimized version of dreambooth for ShivamShrirao into the working directory and install the relevant dependencies (using build version, which may not be supported in subsequent versions) method)
git clone https://github.com/ShivamShrirao/diffusers
cd diffusers
pip install -e .
cd examples\dreambooth
pip install -U -r requirements.txt
pip install OmegaConf
pip install pytorch_lightning
pip install einops
pip install bitsandbytes==0.34
Once this is done, you will need to implement bitsandbytes support on windows according to the methods in this issue
Manually copy the libbitsandbytes_cuda116.dll file from this repository to the venv_diffusers\Lib\site-packages\bitsandbytes in the working directory next to libbitsandbytes_cuda116.so.
Then change the script to apply it, either manually or, for convenience, by downloading the following file to replace it.
Overwrite cextension.py - https://pastebin.com/jjgxuh8V with the venv_diffusers\Lib\site-packages\bitsandbytes directory.
Overwrite main.py - https://pastebin.com/BsEzpdpw to the venv_diffusers\Lib\site-packages\bitsandbytes\cuda_setup directory.
Set PyTorch & Torchvision
pip install torch==1.12.1+cu116 torchvision==0.13.1+cu116 --extra-index-url https://download.pytorch.org/whl/cu116
Test
    python
    >>>import bitsandbytes
If no errors are reported the installation is successful (Ctrl + Z and enter to exit python).
Interim Guide
Set up accelerate
    accelerate config

    In which compute environment are you running? ([0] This machine, [1] AWS (Amazon SageMaker)): 0
    Which type of machine are you using? ([0] No distributed training, [1] multi-CPU, [2] multi-GPU, [3] TPU [4] MPS): 0
    Do you want to run your training on CPU only (even if a GPU is available)? [yes/NO]:NO
    Do you want to use DeepSpeed? [yes/NO]:NO
    Do you wish to use FP16 or BF16 (mixed precision)? [NO/fp16/bf16]: fp16
Follow the setting options above, i.e. (0, 0, NO, NO, fp16).
Videosity Occupancy Optimization
Since xformers are not available, use optimization method in the file instead.
将 attention.py - https://pastebin.com/nmwTrGB9 覆盖到 diffusers\src\diffusers\models 目录。
The environment is now configured and ready for training.
accelerate launch --num_cpu_threads_per_process 8 diffusers/examples/dreambooth/train_dreambooth.py --pretrained_model_name_or_path=models/diffusers_model --pretrained_vae_name_or_path=models/diffusers_model/vae --output_dir=models --concepts_list="concepts_list.json" --with_prior_preservation --prior_loss_weight=1.0 --seed=1337 --resolution=512 --mixed_precision="fp16" --lr_scheduler="constant" --use_8bit_adam --gradient_accumulation_steps=1 --train_batch_size=1 --max_train_steps=800 --save_interval=10000 --learning_rate=1e-6 --num_class_images=100 --lr_warmup_steps=0 --gradient_checkpointing

If you only have one graphics card with no more than 12G of video memory and need to use it for Windows, please close all programs or web pages that consume video memory to reduce additional memory consumption before training.
diffusers cannot be trained directly using ckpt files, they need to be converted first, as shown in the example below.
python diffusers\scripts\convert_original_stable_diffusion_to_diffusers.py --checkpoint_path model.ckpt --original_config_file v1-inference.yaml --scheduler_type ddim --dump_path models/diffusers_model
The training is also packaged and converted to ckpt for use in the WebUI of AUTOMATIC1111.
python diffusers\scripts\convert_diffusers_to_original_stable_diffusion.py --model_path models/resultModel --checkpoint_path result.ckpt --half
This is a temporary solution.
Other?
When the training model is overfitted, the CFG is very influential, so try low the CFG.
DreamBooth Parameter table
usage: argmark [-h] --pretrained_model_name_or_path
               PRETRAINED_MODEL_NAME_OR_PATH [--revision REVISION]
               [--tokenizer_name TOKENIZER_NAME] --instance_data_dir
               INSTANCE_DATA_DIR [--class_data_dir CLASS_DATA_DIR]
               [--instance_prompt INSTANCE_PROMPT]
               [--class_prompt CLASS_PROMPT]
               [--with_prior_preservation]
               [--prior_loss_weight PRIOR_LOSS_WEIGHT]
               [--num_class_images NUM_CLASS_IMAGES]
               [--output_dir OUTPUT_DIR] [--seed SEED]
               [--resolution RESOLUTION] [--center_crop]
               [--use_filename_as_label] [--use_txt_as_label]
               [--train_text_encoder]
               [--train_batch_size TRAIN_BATCH_SIZE]
               [--sample_batch_size SAMPLE_BATCH_SIZE]
               [--num_train_epochs NUM_TRAIN_EPOCHS]
               [--max_train_steps MAX_TRAIN_STEPS]
               [--gradient_accumulation_steps GRADIENT_ACCUMULATION_STEPS]
               [--gradient_checkpointing]
               [--learning_rate LEARNING_RATE] [--scale_lr]
               [--lr_scheduler LR_SCHEDULER]
               [--lr_warmup_steps LR_WARMUP_STEPS] [--use_8bit_adam]
               [--adam_beta1 ADAM_BETA1] [--adam_beta2 ADAM_BETA2]
               [--adam_weight_decay ADAM_WEIGHT_DECAY]
               [--adam_epsilon ADAM_EPSILON]
               [--max_grad_norm MAX_GRAD_NORM] [--push_to_hub]
               [--hub_token HUB_TOKEN] [--hub_model_id HUB_MODEL_ID]
               [--logging_dir LOGGING_DIR]
               [--log_with {tensorboard,wandb}]
               [--mixed_precision {no,fp16,bf16}]
               [--local_rank LOCAL_RANK]
               [--save_model_every_n_steps SAVE_MODEL_EVERY_N_STEPS]
               [--auto_test_model] [--test_prompt TEST_PROMPT]
               [--test_prompts_file TEST_PROMPTS_FILE]
               [--test_negative_prompt TEST_NEGATIVE_PROMPT]
               [--test_seed TEST_SEED]
               [--test_num_per_prompt TEST_NUM_PER_PROMPT]
Arguments
| short | long | default | help |
|---|---|---|---|
-h |
--help |
show this help message and exit | |
--pretrained_model_name_or_path |
None |
Path to pretrained model or model identifier from huggingface.co/models. | |
--revision |
None |
Revision of pretrained model identifier from huggingface.co/models. | |
--tokenizer_name |
None |
Pretrained tokenizer name or path if not the same as model_name | |
--instance_data_dir |
None |
A folder containing the training data of instance images. | |
--class_data_dir |
None |
A folder containing the training data of class images. | |
--instance_prompt |
None |
The prompt with identifier specifying the instance | |
--class_prompt |
None |
The prompt to specify images in the same class as provided instance images. | |
--with_prior_preservation |
Flag to add prior preservation loss. | ||
--prior_loss_weight |
1.0 |
The weight of prior preservation loss. | |
--num_class_images |
100 |
Minimal class images for prior preservation loss. If not have enough images, additional images will be sampled with class_prompt. | |
--output_dir |
text-inversion-model |
The output directory where the model predictions and checkpoints will be written. | |
--seed |
None |
A seed for reproducible training. | |
--resolution |
512 |
The resolution for input images, all the images in the train/validation dataset will be resized to this resolution | |
--center_crop |
Whether to center crop images before resizing to resolution | ||
--use_filename_as_label |
Uses the filename as the image labels instead of the instance_prompt, useful for regularization when training for styles with wide image variance | ||
--use_txt_as_label |
Uses the filename.txt file's content as the image labels instead of the instance_prompt, useful for regularization when training for styles with wide image variance | ||
--train_text_encoder |
Whether to train the text encoder | ||
--train_batch_size |
4 |
Batch size (per device) for the training dataloader. | |
--sample_batch_size |
4 |
Batch size (per device) for sampling images. | |
--num_train_epochs |
1 |
None |
|
--max_train_steps |
None |
Total number of training steps to perform. If provided, overrides num_train_epochs. | |
--gradient_accumulation_steps |
1 |
Number of updates steps to accumulate before performing a backward/update pass. | |
--gradient_checkpointing |
Whether or not to use gradient checkpointing to save memory at the expense of slower backward pass. | ||
--learning_rate |
5e-06 |
Initial learning rate (after the potential warmup period) to use. | |
--scale_lr |
Scale the learning rate by the number of GPUs, gradient accumulation steps, and batch size. | ||
--lr_scheduler |
constant |
The scheduler type to use. Choose between ["linear", "cosine", "cosine_with_restarts", "polynomial", "constant", "constant_with_warmup"] | |
--lr_warmup_steps |
500 |
Number of steps for the warmup in the lr scheduler. | |
--use_8bit_adam |
Whether or not to use 8-bit Adam from bitsandbytes. | ||
--adam_beta1 |
0.9 |
The beta1 parameter for the Adam optimizer. | |
--adam_beta2 |
0.999 |
The beta2 parameter for the Adam optimizer. | |
--adam_weight_decay |
0.01 |
Weight decay to use. | |
--adam_epsilon |
1e-08 |
Epsilon value for the Adam optimizer | |
--max_grad_norm |
1.0 |
Max gradient norm. | |
--push_to_hub |
Whether or not to push the model to the Hub. | ||
--hub_token |
None |
The token to use to push to the Model Hub. | |
--hub_model_id |
None |
The name of the repository to keep in sync with the local output_dir. |
|
--logging_dir |
logs |
TensorBoard log directory. Will default to output_dir/runs/ CURRENT_DATETIME_HOSTNAME**. | |
--log_with |
tensorboard |
None |
|
--mixed_precision |
no |
Whether to use mixed precision. Choosebetween fp16 and bf16 (bfloat16). Bf16 requires PyTorch >= 1.10.and an Nvidia Ampere GPU. | |
--local_rank |
-1 |
For distributed training: local_rank | |
--save_model_every_n_steps |
None |
None |
|
--auto_test_model |
Whether or not to automatically test the model after saving it | ||
--test_prompt |
A photo of a cat |
The prompt to use for testing the model. | |
--test_prompts_file |
None |
The file containing the prompts to use for testing the model.example: test_prompts.txt, each line is a prompt | |
--test_negative_prompt |
`` | The negative prompt to use for testing the model. | |
--test_seed |
42 |
The seed to use for testing the model. | |
--test_num_per_prompt |
1 |
The number of images to generate per prompt. |